
In this guide we’ll learn how to use our custom designed font image for our game.
drawing font [libresprite]
In this part, we will draw the characters needed for only “HELLO WORLD!”. In future, you can draw the required characters for your project with the similar logic.[1]
- Create 90x10 canvas.
- Fill the background with #ff00ff color.
- Create a new layer and draw a total of 9 8x8 pixel squares.
- Color: #0000ff
- There will be 2 pixel space between each square but 1 pixel from the corners.
- Create a new layer and draw characters, “DEHLORW! "
This is how it looks after finished;

If you don’t want to use shader for removing text background, you can remove these square’s with using Edit>Replace Color (Shift+R) method.
- Replacing blue color with alpha.
godot engine
Project Settings.
- Width/Height 128x128
- Test Width/Height 512x512
- Stretch Mode 2d & Aspect keep
- Default Clear Color #0000ff
Copy font image to project folder.
- Presets 2d pixel > Reimport
Setup scene.
- Create Node2D and attach script to it.
Less code, efficient but with Control node Label.[2][3]
extends Node2D
func _ready() -> void:
bitmap_font()
func bitmap_font() -> void:
var font:= BitmapFont.new()
var texture:= preload("res://spr/bitmap-font.png")
var chars:= "dehlorw! "
var c:= 1 # 1px corner space
var j:= 10 # jump for next, 8+2px space
var wh:= 8 # chars width and height
font.add_texture(texture)
for i in range(0,chars.length()):
font.add_char(chars.ord_at(i),0,Rect2(Vector2(i*j+c,c),Vector2(wh,wh)),Vector2.ZERO,wh)
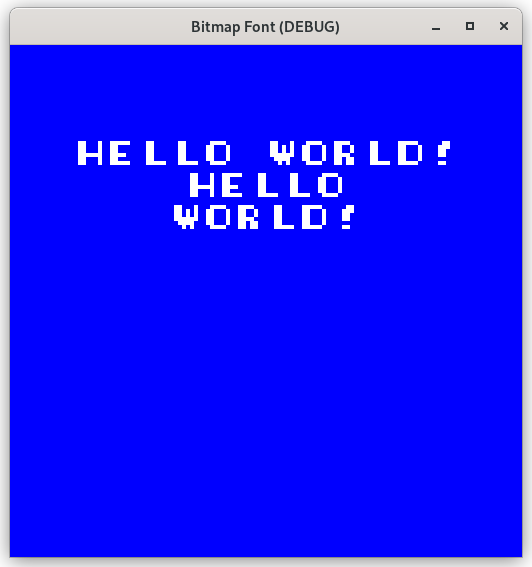
$CanvasLayer/Label.add_font_override("font",font)
Final result;
Without Control node but a bit messy.
variables
# font texture image
const FONT_TEXTURE:Texture = preload("res://spr/bitmap-font.png")
# texture size
const T_SIZE = {w=90,h=10}
# project window size
const WIND = {w=128,h=128}

onready var bitmap_font:BitmapFont = BitmapFont.new()
# hello world!
var chars:String = "dehlorw! "
get every characters from image
# generating bitmap font
func gen_bitmap_font(_w:int,_h:int) -> void:
    bitmap_font.add_texture(FONT_TEXTURE)
    bitmap_font.height = 8 # using for Label -> new line "\n"

    var char_map:Array = []
    for y in range(1,_h,10):
        for x in range(1,_w,10):
            char_map.append(Vector2(x,y))
    for i in range(0,chars.length()):
        bitmap_font.add_char(chars.ord_at(i),0,Rect2(char_map[i],Vector2(8,8)),Vector2.ZERO,8)
display text with the border
# display text with border
func draw_textbox_window(_text:Array) -> void:
    var col:Array = [Color("#fcfcfc"),Color.black]
    var longest:String= ""
    for i in _text:
    if longest.length() < i.length():
        longest = i
    var box_w:int = longest.length()*8+8
    var box_h:int = _text.size()*9+9
    var center:Dictionary = {x=WIND.w/2-(box_w)/2, y=WIND.h/2-(box_h)/2}
    # a little hack for col arr
    for m in range(3):
        draw_rect(Rect2(center.x+m,center.y+m,box_w-m*2,box_h-m*2),col[m-1])
    for t in _text.size():
        draw_string(bitmap_font,Vector2(center.x+3+2,center.y+3+2+t*9),_text[t],col[0])
call gen_bitmap_font() function at first
func _ready() -> void:
    gen_bitmap_font(T_SIZE.w,T_SIZE.h)
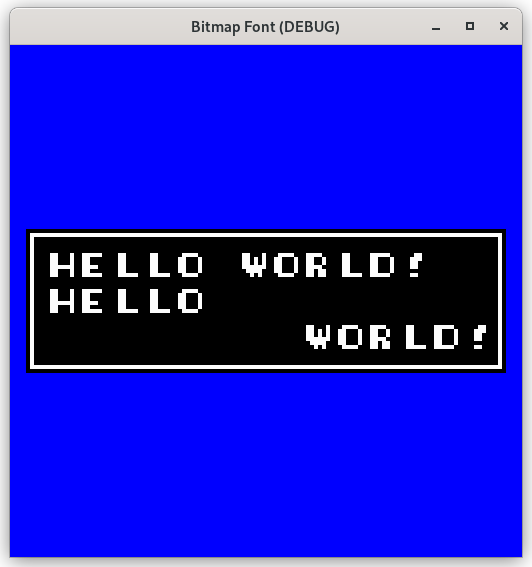
draw text on window
func _draw() -> void:
    draw_textbox_window(["hello world!", "hello", "        world!"])
Final result;
References
For further reference you may want to look some NES bitmap fonts.
From @bruvzg’s answer: https://godotengine.org/qa/89563/how-do-i-load-a-hand-made-bitmap-font-into-godot-as-bitmapfont
Godot Docs: https://docs.godotengine.org/en/stable/classes/class_bitmapfont.html